
Onboarding Module Setup
To view the basic steps to setup Alt go to Module Setup page.
Following are the steps to configure Onboarding:
4. Rule Setup
8. Email Notifications & Templates
9. Configuration of Notification

Onboarding Menus
The menus mentioned below is the master list of the menus available. The access to each one can be configurable based on roles as per the requirement.
- Onboarding Dashboard
- Prospective Hire
- Onboarding Status
- Task Reassign
- Onboarding Reports
- Onboarding Templates
- Onboarding Notification
The above steps are described in detail below:
1. Role Menu Permission
In this we will assign roles against all menus for web & mobile. To assign Role Menu Permission, click here.
2. Module Configuration
In this we will set 3 default module level parameters:
a) ExpectedJoiningDateValidationDays - We need to define no. of days by which the expected DOJ should be allowed to be
preponed.
b) Onboarding Joining Fields - This is for prospective hire/candidates that flow from recruit to onboarding with the required
information. In this we will enable fields at the status of Joined and Offer Accepted i.e. 0 means not visible, 1 means visible.
c) INCORPORATE_HOLIDAY_AND_WO_IN_OB_CHECKLIST_DUEDATE - If holidays and week offs are to be considerd in due
date of onboarding checklist completion then the value of variable to be selected as -ve means prepone checklist due date, 0
means no change in due date or +ve means prepone due date.
3. Workflow Setup
It consists of following stages as mentioned below:
Initiate
i) Click on + icon to create a new workflow which will ask you to fill two fields that need to be updated as -
(1) Name = Onboarding
(2) Type = Onboarding
ii) Click Save to create the workflow.
On saving, a stage panel will appear which will have default two stages-
(1) Initial Stage
(2) Completed
iii) In stages panel, click on context menu to fill the mandatory fields-
(1) Type = Initial
iv) Click on save
On saving, a stage role panel will appear to select the role which will be the actor of the stage along with SLA
Communication
v) In ‘Stage Role’ panel, select the role of ‘HRSSC’ and click on save.
Note: Before moving to next steps all the stages need to be created.
vi) In stages panel, click on context button and select edit to create a workflow stage.
vii) Move to Workflow Stage Action panel, click on + icon which will ask you to fill fields that need to be updated as -
(1) Action Name = Initiate
(2) Is Visible = Select Checkbox
(3) Transition Type = getDefaultRule
viii) On selecting getDefaultRule, a Transitions panel will open which needs to be updated as-
(1) Next Stage = Prospective Hire Approval
(2) From Message = Pending
ix) Click on save to complete the set up.
Prospective Hire Approval
i) In stage panel, click on + icon to create this stage and fill the mandatory fields-
(1) Name = Prospective Hire Approval
(2) Type = ProspectiveHireApproval
ii) Click on save
On saving, a stage role panel will appear to select the role which will be the actor of the stage along with SLA
Communication
iii) In ‘Stage Role’ panel, select the role of ‘HR Manager’ and click on save.
iv) In stages panel, click on context button and select edit to create a workflow stage.
v) Move to Workflow Stage Action panel, click on + icon which will ask you to fill fields that need to be updated as -
(1) For Approve
(a) Action Name = Approve
(b) Is Visible = Select Checkbox
(c) Transition Type = getDefaultRule
(d) On selecting getDefaultRule, a Transitions panel will open which needs to be updated as:
(i) Next Stage = Checklist Approval
(ii) From Message = In Progress
(2) For Reject
(a) Type = Reject
(b) Action Name = Reject
(c) Transition Type = getDefaultRule
(d) On selecting getDefaultRule, a Transitions panel will open which needs to be updated as
(i) Next Stage = Onboarding
(ii) From Message = Dropped
vi) Click on save to complete the set up.
Checklist Approval
i) In stage panel, click on + icon to create this stage and fill the mandatory fields-
(1) Name = Checklist Approval
(2) Type = CheckListApproval
ii) Click on save
On saving, a stage role panel will appear to select the role which will be the actor of the stage along with SLA
Communication
iii) In ‘Stage Role’ panel, select the role of ‘L1 Manager’ and click on save.
iv) Move to ‘Workflow Stage Action’ panel, click on + icon which will ask you to fill fields that need to be updated as -
(1) Action Name = Assign
(2) Is Visible = Select Checkbox
(3) Transition Type = getDefaultRule
v) On selecting getDefaultRule, a Transitions panel will open which needs to be updated as-
(1) Next Stage = Pre Offer
(2) From Message = Pending
vi) Click on save to complete the set up.
Pre Offer
i) In stage panel, click on + icon to create this stage and fill the mandatory fields-
(1) Name = Pre Offer
(2) Type = PreOffer
ii) Click on save
On saving, a stage role panel will appear to select the role which will be the actor of the stage along with SLA
Communication
iii) In ‘Stage Role’ panel, select the role of ‘HR Manager’ and click on save.
iv) Move to ‘Workflow Stage Action’ panel, click on + icon which will ask you to fill fields that need to be updated as -
(1) Type = Submit
(2) Action Name = Move to Offer Generation
(3) Is Visible = Select Checkbox
(4) Transition Type = getDefaultRule
v) On selecting getDefaultRule, a Transitions panel will open which needs to be updated as-
(1) Next Stage = Offer Generation
(2) From Message = Pending
vi) Click on save to complete the set up.
Offer Generation
i) In stage panel, click on + icon to create this stage and fill the mandatory fields-
(1) Name = Offer Generation
(2) Type = OfferGeneration
ii) Click on save
On saving, a stage role panel will appear to select the role which will be the actor of the stage along with SLA
Communication
iii) In ‘Stage Role’ panel, select the role of ‘HR Manager’ and click on save.
iv) Move to ‘Workflow Stage Action’ panel, click on + icon which will ask you to fill fields that need to be updated as -
(1) Type = Submit
(2) Action Name = Move to Offer Acceptance
(3) Is Visible = Select Checkbox
(4) Transition Type = getDefaultRule
v) On selecting getDefaultRule, a Transitions panel will open which needs to be updated as-
(1) Next Stage = Offer Acceptance
(2) From Message = Pending
vi) Click on save to complete the set up.
Offer Acceptance
i) In stage panel, click on + icon to create this stage and fill the mandatory fields-
(1) Name = Offer Acceptance
(2) Type = OfferAcceptance
ii) Click on save
On saving, a stage role panel will appear to select the role which will be the actor of the stage along with SLA
Communication
iii) In ‘Stage Role’ panel, select the role of ‘HR Manager’ and click on save.
iv) Move to ‘Workflow Stage Action’ panel, click on + icon which will ask you to fill fields that need to be updated as -
(1) Type = InitiateOnboarding
(2) Action Name = Accept
(3) Is Visible = Select Checkbox
(4) Transition Type = getDefaultRule
v) On selecting getDefaultRule, a Transitions panel will open which needs to be updated as-
(1) Next Stage = Pre Joining
(2) From Message = Pending
vi) Click on save to complete the set up.
Pre Joining
i) In stage panel, click on + icon to create this stage and fill the mandatory fields-
(1) Name = Pre Joining
(2) Type = PreJoining
ii) Click on save
On saving, a stage role panel will appear to select the role which will be the actor of the stage along with SLA
Communication
iii) In ‘Stage Role’ panel, select the role of ‘HR Manager, Prospective Hire along with NDC Admin’ and click on save.
iv) Move to Workflow Stage Action panel, click on + icon which will ask you to fill fields that need to be updated as -
(1) For Move to Joining
(a) Type = YetToJoin
(b) Action Name = Move to Joining Stage
(c) Is Visible = Select Checkbox
(d) Transition Type = getDefaultRule
(e) On selecting getDefaultRule, a Transitions panel will open which needs to be updated as
(i) Next Stage = Joining
(ii) From Message = Yet to Join
(2) For Delayed
(a) Type = Delayed
(b) Action Name = Delayed
(c) Is Visible = Select Checkbox
(d) Transition Type = getDefaultRule
(e) On selecting getDefaultRule, a Transitions panel will open which needs to be updated as
(i) Next Stage = Delayed Joining
(ii) From Message = Joining Delayed
(3) For Not Interested
(a) Type = NotInterested
(b) Action Name = Not Interested
(c) Is Visible = Select Checkbox
(d) Transition Type = getDefaultRule
(e) On selecting getDefaultRule, a Transitions panel will open which needs to be updated as
(i) Next Stage = Onboarding
(ii) From Message = Dropped
v) Click on save to complete the set up.
Delayed Joining
vi) In stage panel, click on + icon to create this stage and fill the mandatory fields-
(1) Name = Delayed Joining
(2) Type = DelayedJoining
vii) Click on save
On saving, a stage role panel will appear to select the role which will be the actor of the stage along with SLA
Communication
viii) In ‘Stage Role’ panel, select the role of ‘HRSSC’ and click on save.
ix) Move to Workflow Stage Action panel, click on + icon which will ask you to fill fields that need to be updated as -
(1) For Move to Joining
(a) Type = YetToJoin
(b) Action Name = Move to Joining Stage
(c) Is Visible = Select Checkbox
(d) Transition Type = getDefaultRule
(e) On selecting getDefaultRule, a Transitions panel will open which needs to be updated as
(i) Next Stage = Joining
(ii) From Message = Yet to Join
(2) For Delayed
(a) Type = Delayed
(b) Action Name = Delayed
(c) Is Visible = Select Checkbox
(d) Transition Type = getDefaultRule
(e) On selecting getDefaultRule, a Transitions panel will open which needs to be updated as
(i) Next Stage = Delayed Joining
(ii) From Message = Joining Delayed
(3) For Not Interested
(a) Type = NotInterested
(b) Action Name = Not Interested
(c) Is Visible = Select Checkbox
(d) Transition Type = getDefaultRule
(e) On selecting getDefaultRule, a Transitions panel will open which needs to be updated as
(i) Next Stage = Onboarding
(ii) From Message = Dropped
x) Click on save to complete the set up.
Joining
i) In stage panel, click on + icon to create this stage and fill the mandatory fields-
(1) Name = Joining
(2) Type = Joining
ii) Click on save
On saving, a stage role panel will appear to select the role which will be the actor of the stage along with SLA
Communication
iii) In ‘Stage Role’ panel, select the role of ‘HRSSC’ and click on save.
iv) Move to Workflow Stage Action panel, click on + icon which will ask you fill fields that needs to updated as -
(1) For Joined
(a) Action Name = Joined
(b) Is Visible = Select Checkbox
(c) Transition Type = getDefaultRule
(d) On selecting getDefaultRule, a Transitions panel will open which need updated as
(i) Next Stage = Post Joining
(ii) From Message = In Progress
(2) For Not Joined
(a) Type = Not Joined
(b) Action Name = Not Joined
(c) Is Visible = Select Checkbox
(d) Transition Type = getDefaultRule
(e) On selecting getDefaultRule, a Transitions panel will open which needs to be updated as
(i) Next Stage = Onboarding
(ii) From Message = Dropped
v) Click on save to complete the set up.
Post Joining
i) In stage panel, click on + icon to create this stage and fill the mandatory fields-
(1) Name = Post Joining
(2) Type = PostJoining
ii) Click on save
On saving, a stage role panel will appear to select the role which will be the actor of the stage along with SLA
Communication
iii) In ‘Stage Role’ panel, select the role of ‘HR manager’ and click on save.
iv) Move to ‘Workflow Stage Action’ panel, click on + icon which will ask you to fill fields that need to be updated as -
(1) Type = OnboardingCompleted
(2) Action Name = Onboarding Completed
(3) Is Visible = Select Checkbox
(4) Transition Type = getDefaultRule
v) On selecting getDefaultRule, a Transitions panel will open which needs to be updated as-
(1) Next Stage = Onboarding
(2) From Message = Successful
vi) Click on save to complete the set up.
Onboarding
i) In stage panel, click on + icon to create this stage and fill the mandatory fields-
(1) Name = Onboarding
(2) Type = Completed
ii) Click on save
On saving, a stage role panel will appear to select the role which will be the actor of the stage along with SLA
Communication
iii) In stage role panel, select the role of HRSSC and click on save.
4. Rule Setup
(To be done by PeopleStrong Team)
To set the checklist, we need to make changes in the drool file and restart the server.
Pass the Organization ID and Tenant ID and the template name in the drool file.
5. Form Security Setup
a) Before starting the form security set up, go through the how to guide for the same.
b) Go to Admin -> Configuration -> Form Configuration
a. Search for Form Name – NewOnboarding
b. Form for Modify Compensation stage -- SalaryEditWF
c) Click on context level security and select Role as per requirement. As My Detail is visible to employee, Select the Role as Employee and click on Show Configuration.
d) Now you can choose any of the options from View, Deny, Editable non mandatory and Editable mandatory. You can also choose Approval Enabled, Approval Required, Effective Date Required and Approval Required.
Note: For accurately designing the Form security, we need to share the below mentioned file with the client and then give the form security as per their requirement.
6. Checklist Setup
How to create a checklist item
(a) After this stage Onboarding checklist set up needs to be done
(i) To set up checklist for Onboarding go to Worklife -> HRIS -> Configuration -> Checklist
(ii) Create a Checklist Group
1. Group Name= Pre Joining Activity
2. *Workflow = Onboarding
3. *Stage= Pre Joining (Can be any stage of workflow)
4. Role= L1 Manager
5. Description = Pre Joining Checklist

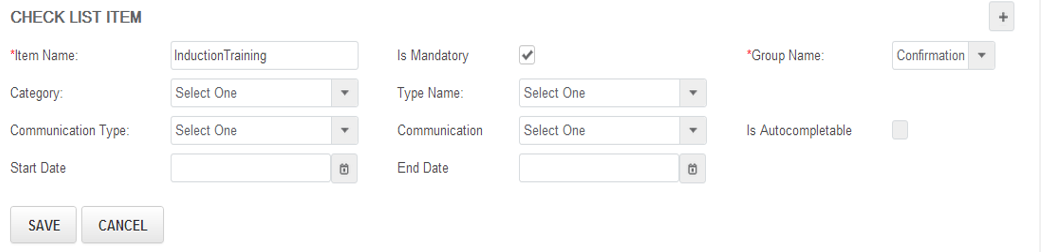
(iii) Create Checklist Item : This step is to link the Checklist Group with the Checklist Item
1. Item Name= Name of the checklist item
2. Is Mandatory = As per requirement
3. Group Name= Onboarding
4. Category: Not used in Onboarding
5. Type Name = There are various categories of checklist items in OB. These are system defined types of checklists. Type
name entry is done by back end in ''SysChecklistItemType''
a. Assign Buddy: This type is used for configuring Assign Buddy Feature in checklist
b. Pre Joining Form:
c. Generate ECN: This type of checklist is used to Generate Employee codes
d. Document
e. Generate Email
f. Verify Compensation
g. Boarding Pass: This type will generate boarding pass and send it to Prospective hire from that checklist item
h. Approval: This type of checklist item needs approval form their approver like HR Manager.
i. Compose mail: This type can be used to compose mails and send directly as a checklist from Onboarding Details
page.
j. Define Compensation
k. Generate Offer
l. Approve Offer
m. Create SesaId
n. Statutory Forms 11, 13, 2, F: This type is used to configure statutory forms.
6. Communication Type = Onboarding
a. Communication:
i. The mail templates setup in Onboarding portal are linked to the checklist through this drop down .i.e. after completion of
the checklist, which mail is to be sent is configured here
7. Is Autocompletable: True/False. The value True signifies the checklist item is autocompletable
8. Start Date: Not used in Onboarding
9. End Date: Not used in Onboarding
(iv) Create a checklist template with Name , Description and Active =1

(v) Create a checklist template item with the following attributes:
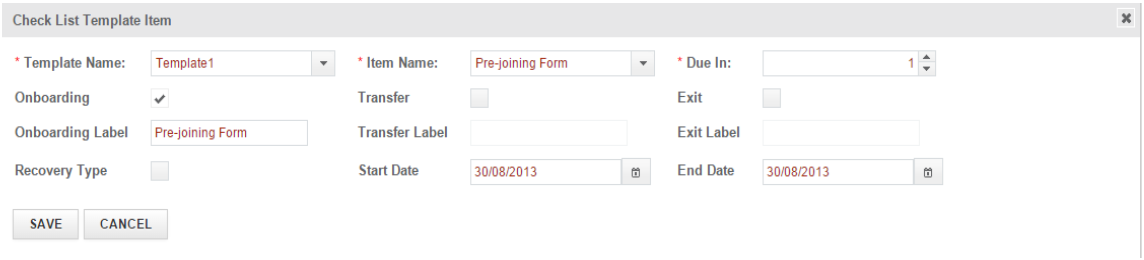
Template Name – Select Template name from drop down list.
Item Name – Select Item name from drop down List.
Due In – This is the day count for complete checklist item task before or after the Expected joining date by stakeholders.
Onboarding – Tick the checkbox of onboarding to tag this template with onboarding module.
Onboarding Label - Enter a Label name for onboarding.
7. Candidate Portal Setup
Following are the items needs to be setup in Onboarding Candidate portal:
1. Candidate Form:
a. Go To Admin Portal and give the Organizational Level Form Security to the My Details Page. This will configure the pre joining
Form as per requirement.
2. Company Video
a. Go To Super Admin Portal -> Organization -> Organization List -> Edit an Organization -> Go to More Info button on OB portal
configuration and click on the “+�? button in External Video Path and enter the embedded You Tube link or any external link and
the module name as Onboarding.
3. Statutory forms
a. The statutory forms in the OB portal are created through checklist items. The checklist item of Type Statutory Form needs to be
created in order to see the statutory forms in OB portal Home Page.
8. Email Notifications & Templates
Mail templates will be required to send email notifications for each and every transactions which are taking place in system for Onboarding. For this we need to create the mail templates by following below mentioned steps:
1. Login to Alt Worklife portal as Admin, Onboarding > Configuration > Onboarding. Template.
2. Click on + sign to create the template.
3. Write the mentioned details:
i) Template Name: Onboarding
ii) Description: Onboarding mail templates
iii) Module Name: Onboarding (screen shot for reference is attached)

| Field name (label) | Description | |
| 1. | Organization | Define Organization name to configure mail template. |
| 2. | Template Name | Define Template name for selected organization. E.g. Onboarding Welcome Mail. |
| 3. | Description | Add Description for given Template. |
| 4. | Communication Type | Select communication type from drop down list. |
| Template Format | ||
| 1. | To | Configure employee mail id in this column. |
| 2. | Cc | -- |
| 3. | Subject | Write mail template subject name in this column. |
| 4. | Body | Configure the body text for mail template and use placeholders to put employee name, company name etc. from system. |
9. Configuration of Notification
1. Login to Alt Worklife portal as admin, go to Onboarding -> Configuration -> Onboarding Notification
2. Commid needs to be update from syscommunicaionconfig table to Hrchecklistitem from backend. (Need to contact Peoplestrong team for this)
3.
| Field name (Label) | Description | |
| 1. | Communication Name | Enter communication name manually in this field. |
| 2. | Communication Mode | If select email then it will notify this mail through email if select SMS then notify mail with SMS. |
| 3. | Communication Type | Select Communication Type same as template configuration Onboarding. |
| 4. | Mail Account | To associate this mail account select that account from drop down list. |
| 5. | Template | Select template name from drop down to configure. |
| 6. | Mark Active | if mark active is checked then it will be active for selected template, and if not checked then mail will not be sent for particular activity for their stakeholders. |
